The knitted linen stitch is a fabulous way to knit flat fabric with a dense, woven-like structure, similar to Tunisian crochet. It is easy to learn and can be knitted in rows on both single-pointed knitting needles and circular needles. Once you master the linen stitch, there is an alternative way to work the linen stitch in rounds, too,
If you have not tried it yet, the linen stitch is absolutely worth giving a go, so make yourselves comfortable with your favourite knitting needles and some yarn to match, and let’s work this intriguing stitch together.
What is the Linen Stitch?
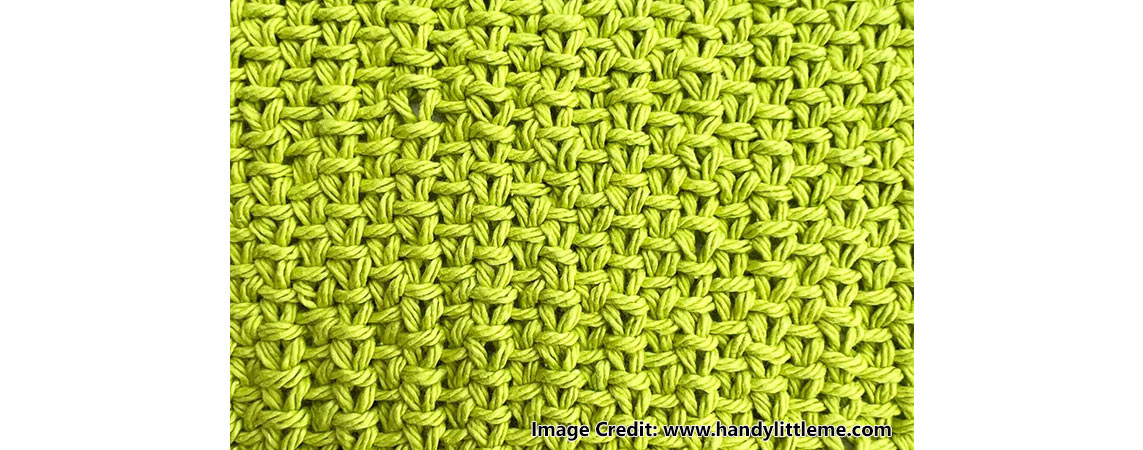
The linen stitch creates a texture that resembles woven linen, hence its name. This stitch produces a sturdy fabric with minimal stretch. It lies completely flat and is ideal for all your projects requiring stability without curling edges yet offering some stretchiness. Think shawls, bags, coasters, blankets, placemats or baskets.
Visually Appealing Look
The linen stitch has a smooth surface on the right side, characterized by enchanting, interlocking 'v' shapes. It is not a completely reversible pattern, as the wrong side of the work is slightly bumpier and resembles more of a seed stitch pattern, yet it is visually equally appealing.
Your Introduction to Slip Stitch Techniques
The stitch pattern is a simple two-row repeat and achieved by slipping stitches with a technique called SL1PW (Slip 1 stitch purlwise) while carrying the yarn in front. On the wrong side of your work, these stitches will later be knitted. When working the linen stitch in rows on circular knitting needles ,it is crucial to cast on an even number of stitches.

Knitting the Linen Stitch in Rows Step by Step:
Row 1: (Right Side):
- Knit 1 (K1): Start by knitting the first stitch.
- Bring the yarn to the front (YF): Move the yarn to the front of your working needle as if you're going to purl.
- Slip 1 stitch purlwise (SL1PW) Slip the next stitch from the left knitting needle to the right needle as if to purl, with the yarn in front.
- Now, move the yarn to the back (YB)
- Continue across the row: Repeat the sequence of knitting one stitch, then bring the yarn to the front, slipping one stitch purlwise with the yarn in front, and moving the yarn again to the back.
- End the first row with a knit stitch.
Row 2 (Wrong Side):
- Purl 1 (P1): Start by purling the first stitch.
- (YB): Move the yarn to the back as if you're going to knit.
- (SL1PW): Slip the next stitch from the left to the right needle as if to purl, with the yarn in the back.
- (YF): Bring the yarn to the front of the work.
- Continue across the row, repeating the sequence.
- End with a purl stitch.
These two rows are repeated throughout your project. The result is a beautifully dense, slightly stretchy fabric perfect for all projects requiring a bit of structure. However, the slip stitch technique uses slightly more yarn than conventional stockinette or garter knitting. When testing the linen stitch, creating a larger gauge swatch than usual, perhaps a washcloth, is always recommended to calculate the required yarn for a bigger project.
Can you Knit the Linen Stitch on Circular Knitting Needles?
Yes, you can, the Linen Stitch works beautifully for tubular projects like hats, socks, cowls, and sweaters. However, the process differs slightly from working it flat because there are no return rounds. You always look at the right side of the fabric when working on circular or double pointed knitting needles in rounds.
You use a modified version of the first row in your second round when knitting the linen stitch in seamless circumferences. Like working the Linen Stitch in rows, you also cast on an even number of stitches onto your circular knitting needles or DPNs. Then join the stitches to work in the round; be careful not to twist your stitches. Find more tips on how to knit in the round by navigating to this blog article.
Round 1:
- (K1): Start by knitting the first stitch.
- (YF): Move the yarn to the front as if to purl.
- (SL1PW): Slip the next stitch purlwise from the left to the right needle with the yarn still in front.
- (YB): Move the yarn to the back of the work.
- Repeat the sequence of K1, YF, SL1PW with YF, YB to the end of the round.
Round 2:
- (YF): Start this round with the yarn in front.
- (SL1PW): Slip the first stitch purlwise with the yarn in front.
- (YB, K1): Move the yarn to the back and knit the next stitch.
- Repeat the sequence to the end of the round.
Continue repeating these two rounds for the length of your project.
Tips for Knitting Linen Stitch in the Round:
- Use a stitch marker at the beginning of your round.
- Keep a consistent tension, as the Linen Stitch might look a bit wonky when knitted too tight.
- Remember, the linen stitch can be a yarn eater, so plan your ýarn consumption accordingly.
The versatile and striking linen stitch also serves as an ideal introduction to mosaic colourwork. Both techniques rely on slipped stitches and create delightful structures. With KnitPro’s exceptional array of knitting needles and stunning selection of interchangeable needle sets at your disposal, you ensure you always have the perfect knitting needles at hand while enjoying every stitch you create.


